Ero sivun ”Käyttäjien hallinta/en” versioiden välillä
(Ak: Uusi sivu: *Name the user (for ex. Anton Advertiser) *Give a username i.e. user’s e-mail address *Generate a password by clicking the dice or come up with your own password *Tick ”send to...) |
|||
| (31 välissä olevaa versiota samalta käyttäjältä ei näytetä) | |||
| Rivi 6: | Rivi 6: | ||
| − | [[Tiedosto:Käyttäjien hallinta- | + | [[Tiedosto:Käyttäjien hallinta-0_en.jpg|frameless|1200px]] |
=== Adding new users === | === Adding new users === | ||
| − | [[Tiedosto: | + | [[Tiedosto:Käyttäjien hallinta-2_en.png|right|800px]] [[Tiedosto:Käyttäjien hallinta-3_en.jpg|right|500px]] |
You can create a new user from the ”Users” tab. | You can create a new user from the ”Users” tab. | ||
| Rivi 29: | Rivi 29: | ||
<br clear=all> | <br clear=all> | ||
| − | [[Tiedosto:Käyttäjien hallinta- | + | [[Tiedosto:Käyttäjien hallinta-4_en.png|right|1000px]] |
| − | ''''' | + | '''''NOTE! After saving the user, the access level and the administrable zones of the user are defined. ''''' |
| − | + | Select the access level of the user from the dropdown menu (zone admin, advanced user, conference user). The most common access level for a user is Zone admin (zone admins control the materials, templates and users of their organization) | |
<br clear=all> | <br clear=all> | ||
| − | [[Tiedosto:Käyttäjien hallinta- | + | [[Tiedosto:Käyttäjien hallinta-5_en.png|right|600px]] |
| − | + | Choose which zones (for ex. office / unit) the user administrates by clicking the name of the zone in the ” Non-Administrable Zones” section and moving it to the ”Administrable Zones” section using the green arrow. | |
<br clear=all> | <br clear=all> | ||
| − | [[Tiedosto:Käyttäjien hallinta- | + | [[Tiedosto:Käyttäjien hallinta-6_en.jpg|right|600px]] |
| − | === | + | === Removing zones from a user === |
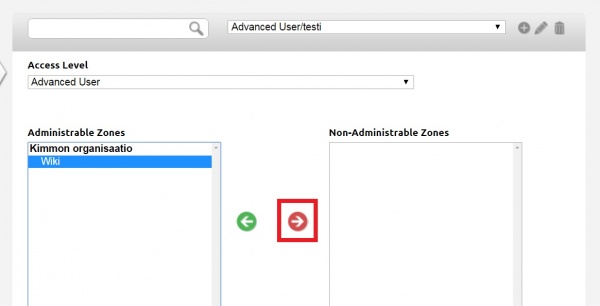
| − | + | You can remove zones from a user by selecting the user from the dropdown list (or using the search tool). Select the zone to be removed from the ”Administrable Zones” section and click the red arrow. The zone will move to the ”Non-Administrable Zones” section. | |
<br clear=all> | <br clear=all> | ||
| − | [[Tiedosto:Käyttäjien hallinta- | + | [[Tiedosto:Käyttäjien hallinta-7_en.png|right|800px]] |
| − | === | + | === Modifying and deleting users === |
| − | + | You can modify a user by clicking the pencil icon next to the user’s name after selecting the user from the dropdown menu. | |
| − | + | Modify the information if needed (for ex. a new e-mail) and save. | |
| − | + | You can remove a user by clicking the garbage bin icon next to the user’s name after selecting the user from the dropdown menu. | |
| − | + | Untick the "Active" box and click "Save". | |
<br clear=all> | <br clear=all> | ||
| − | [[Tiedosto:Käyttäjien hallinta- | + | [[Tiedosto:Käyttäjien hallinta-8_en.png|right|500px]] |
| − | === | + | === Locking a username === |
| − | + | You can lock a username by clicking the pencil icon next to the user’s name. | |
| − | + | Remove the ”Active” option from the menu that opens. Click Save when done. | |
<br clear=all> | <br clear=all> | ||
| − | === | + | === What are free users? === |
| − | ''''' | + | '''Free users''' are usernames that haven’t been given rights to manage any organization or zone. They can only browse the FirstView Manager. Free users can be seen by all users, but you can’t use them to log in. |
| − | + | When creating a new user define the username, password and language. After clicking ”Save” BE SURE to select the access level from the dropdown list, and the administrable zones of the user. | |
Nykyinen versio 27. syyskuuta 2016 kello 08.56
Sisällysluettelo
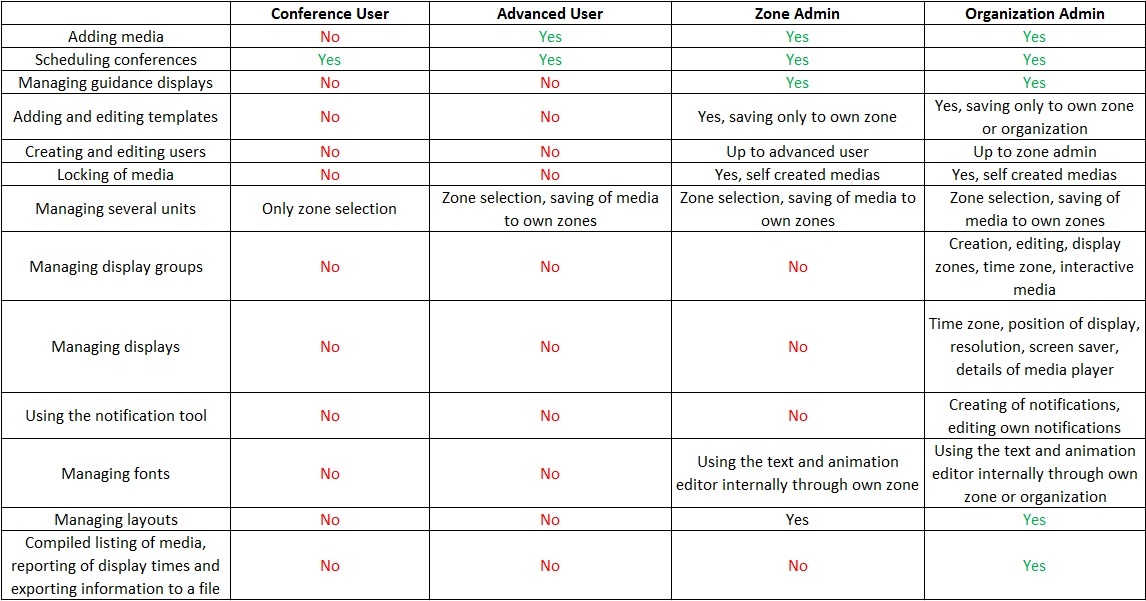
Access levels
It is possible to create users with different access levels in the FirstViewManager. The user has different rights depending on his/her access level.
Adding new users
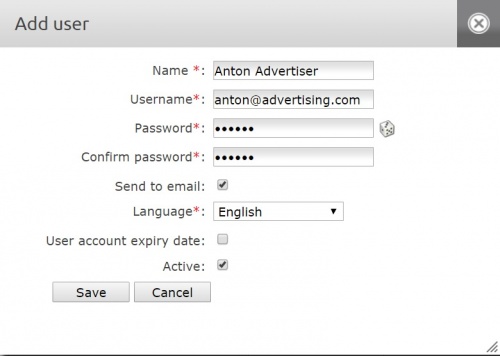
You can create a new user from the ”Users” tab.
In the User Management, new users can be created or existing users modified/removed.
A new user can be created by clicking the plus sign next to the dropdown menu.
- Name the user (for ex. Anton Advertiser)
- Give a username i.e. user’s e-mail address
- Generate a password by clicking the dice or come up with your own password
- Tick ”send to e-mail” so the user receives the passwor to his/her e-mail
- Choose the user’s language and a possible account expiry date for the username (for temporary workers)
- Click ”Save”
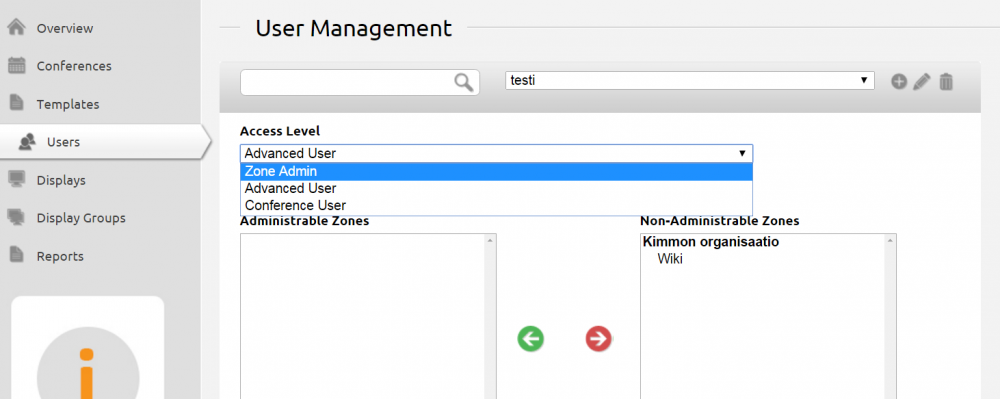
NOTE! After saving the user, the access level and the administrable zones of the user are defined.
Select the access level of the user from the dropdown menu (zone admin, advanced user, conference user). The most common access level for a user is Zone admin (zone admins control the materials, templates and users of their organization)
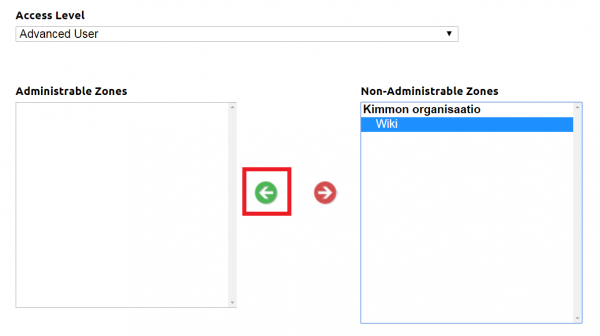
Choose which zones (for ex. office / unit) the user administrates by clicking the name of the zone in the ” Non-Administrable Zones” section and moving it to the ”Administrable Zones” section using the green arrow.
Removing zones from a user
You can remove zones from a user by selecting the user from the dropdown list (or using the search tool). Select the zone to be removed from the ”Administrable Zones” section and click the red arrow. The zone will move to the ”Non-Administrable Zones” section.
Modifying and deleting users
You can modify a user by clicking the pencil icon next to the user’s name after selecting the user from the dropdown menu.
Modify the information if needed (for ex. a new e-mail) and save.
You can remove a user by clicking the garbage bin icon next to the user’s name after selecting the user from the dropdown menu.
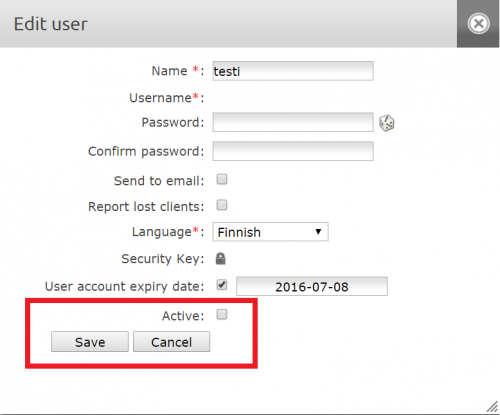
Untick the "Active" box and click "Save".
Locking a username
You can lock a username by clicking the pencil icon next to the user’s name.
Remove the ”Active” option from the menu that opens. Click Save when done.
What are free users?
Free users are usernames that haven’t been given rights to manage any organization or zone. They can only browse the FirstView Manager. Free users can be seen by all users, but you can’t use them to log in.
When creating a new user define the username, password and language. After clicking ”Save” BE SURE to select the access level from the dropdown list, and the administrable zones of the user.
