Ero sivun ”Mediasoittimen verkkoasetusten konfigurointi/en” versioiden välillä
(Ak: Uusi sivu: 1. Copy the player.conf file to an empty USB flash drive. (The name of the file has to be exactly '''player.conf''' for the media player to recognize the file)) |
(Ak: Uusi sivu: 2. Plug the USB flash drive into one of the media player’s available USB-ports. (The media player has to be on and plugged into the display.)) |
||
| Rivi 38: | Rivi 38: | ||
1. Copy the player.conf file to an empty USB flash drive. (The name of the file has to be exactly '''player.conf''' for the media player to recognize the file) | 1. Copy the player.conf file to an empty USB flash drive. (The name of the file has to be exactly '''player.conf''' for the media player to recognize the file) | ||
| − | 2. | + | 2. Plug the USB flash drive into one of the media player’s available USB-ports. (The media player has to be on and plugged into the display.) |
3. Odota kunnes näyttöön ilmestyy vaalea “Media player configuration” ruutu. Voit vielä tarkastaa ruudusta, että verkkotiedot on syötetty tiedostoon oikein. | 3. Odota kunnes näyttöön ilmestyy vaalea “Media player configuration” ruutu. Voit vielä tarkastaa ruudusta, että verkkotiedot on syötetty tiedostoon oikein. | ||
Versio 5. heinäkuuta 2016 kello 12.54
1. Creating a configuration file
The creator of the configuration file must be logged in as the organization’s administrator.
Log in: https://login.firstviewds.com
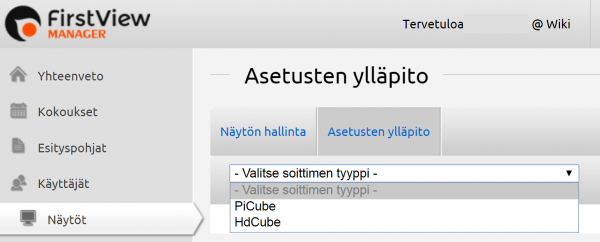
Select the "Displays" tab from the left side of the FirstView Manager.
Move to the Configuration / Administration tab and select the type of the media player.
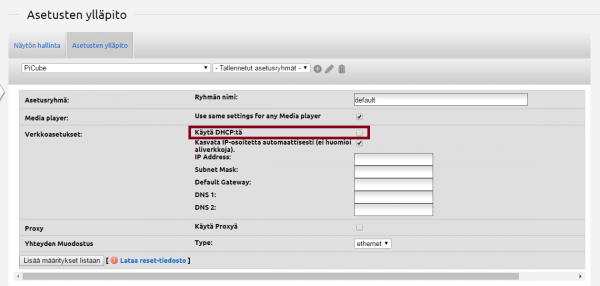
The settings group already has DHCP Ethernet settings. Remove the DHCP selection if static IP-addresses are being used and provide the following information:
- IP
- Subnet Mask
- Gateway
- DNS1
- DNS2
Choose ”use a proxy” if a proxy is being used and fill in the correct Proxy address.
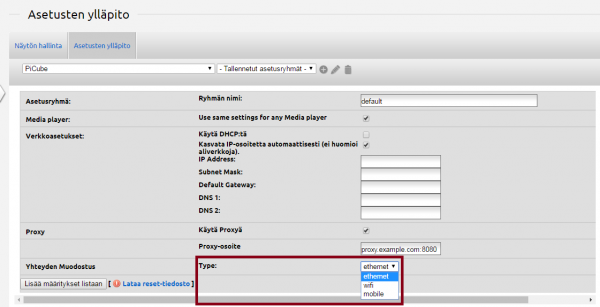
Choose “Type” (Ethernet, wifi, mobile) and fill in the information if needed.
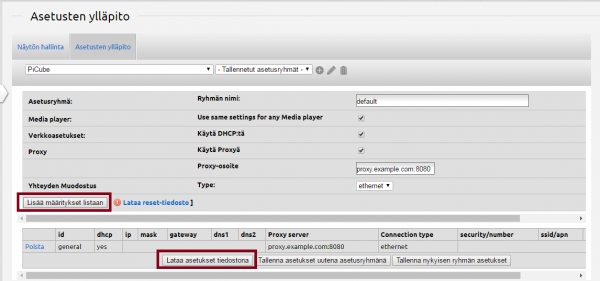
You can add the preferences to the list and download the settings as a file.
2. Configuring the media player
1. Copy the player.conf file to an empty USB flash drive. (The name of the file has to be exactly player.conf for the media player to recognize the file)
2. Plug the USB flash drive into one of the media player’s available USB-ports. (The media player has to be on and plugged into the display.)
3. Odota kunnes näyttöön ilmestyy vaalea “Media player configuration” ruutu. Voit vielä tarkastaa ruudusta, että verkkotiedot on syötetty tiedostoon oikein.
4. Poista USB-tikku mediasoittimesta
5. Konfiguraatio on valmis ja mediasoitin käynnistää itsensä uudelleen
Muuta huomioitavaa mediasoittimen konfiguraatiossa:
- Konfiguraatiotiedostoa ei voi tehdä Safari –selaimella
- Mediasoitin tunnistaa vain player.conf-nimisen tiedoston, joten otathan huomioon useita konfiguraatiotiedostoja tehtäessä kerralla, ettei tiedoston nimi muutu muotoon player(1).conf… jne
- Jos konfiguraatiotiedosto on avattava, käytä esim. Notepadia tai Wordpadia, sillä esimerkiksi Word lisää tiedoston nimeen .txt.
Jos sinulla on kysymyksiä, älä epäröi ottaa yhteyttä FirstView:n tukeen:
tuki@firstview.fi
+358 50 3807983
HDCuben (ID 6-0xxxx) ja Mediacuben (ID 9-0xxxx) konfigurointi
HDCuben (ID 6-0xxxx) langattoman (Wifi) yhteyden konfigurointi


